Modeling a process in the Business Process Center lets you capture how work actually happens (the as‑is), design an improved version (the to‑be), and create the clean, metadata‑rich models you’ll simulate, score, and convert into opportunities. This guide walks you through everything, from creating the process (four ways) to documenting activity details so your model is simulation‑ready.
Quick start (use this every time)
Create your process (Create from Scratch / Import / AI / Platform).
Model activities & gateways (build your as‑is).
Document process + activity metadata (RACI, systems, timing, cost).
Prepare for simulation and opportunities (durations, probabilities, resources).
Now let’s go step‑by‑step
Part 1 - Create your Process Model (Choose one of four)
Option A: Create from Scratch (most common)
First, open the Business Process Module. Click Actions → Create from Scratch. The BPMN modeler opens.
Name it: Procure to Pay (P2P).
Add Process Owner, Tags, and Folder Location (so it’s organized).
Click Create — you’re in a blank canvas.
That’s your safe blank slate. Save early and often with Save or Save & Close.
Option B: Import from File (BPMN or Visio)
If you already have a diagram:
Click Actions → Import from File.
Choose format:
BPMN (.bpmn) — best fidelity for BPMN tools.
Visio (.vsdx) — Visio 2013+ with BPMN 2.0 shapes.
Upload the file. BC will convert and open it in the modeler.
Review: Activity labels, swimlanes, and gateways may need adjustment.
Tips: Use standard BPMN shapes and clear labels. Avoid bridged connectors and custom shapes for smoother import.
Option C: Import from Platform (e.g., Blueworks Live)
If your org uses Blueworks Live:
Click Actions → Import from Platform → Import from Blueworks Live.
Authenticate and pick the processes you want to import.
Click Import and you’ll be redirected to the process view to edit.
Note: Some elements may be imported only partially or not at all. Review Robot Tasks, Linked Processes, and Loops after import.
Option D: Generate with AI (SPADE)
Have policies, SOPs, meeting notes, or PDFs, SPADE can auto‑generate a process.
Click Actions → Generate with AI (SPADE).
Upload docs (.doc/.docx/.pdf/.txt).
SPADE analyzes text and returns a draft BPMN + SIPOC and recommended details.
Open in the modeler and refine.
Pro tip: SPADE gets you 60%+ of the way, always review for activity labels, participants, gateways, and details.
Part 2: Lay out the core workflow (modeling basics)
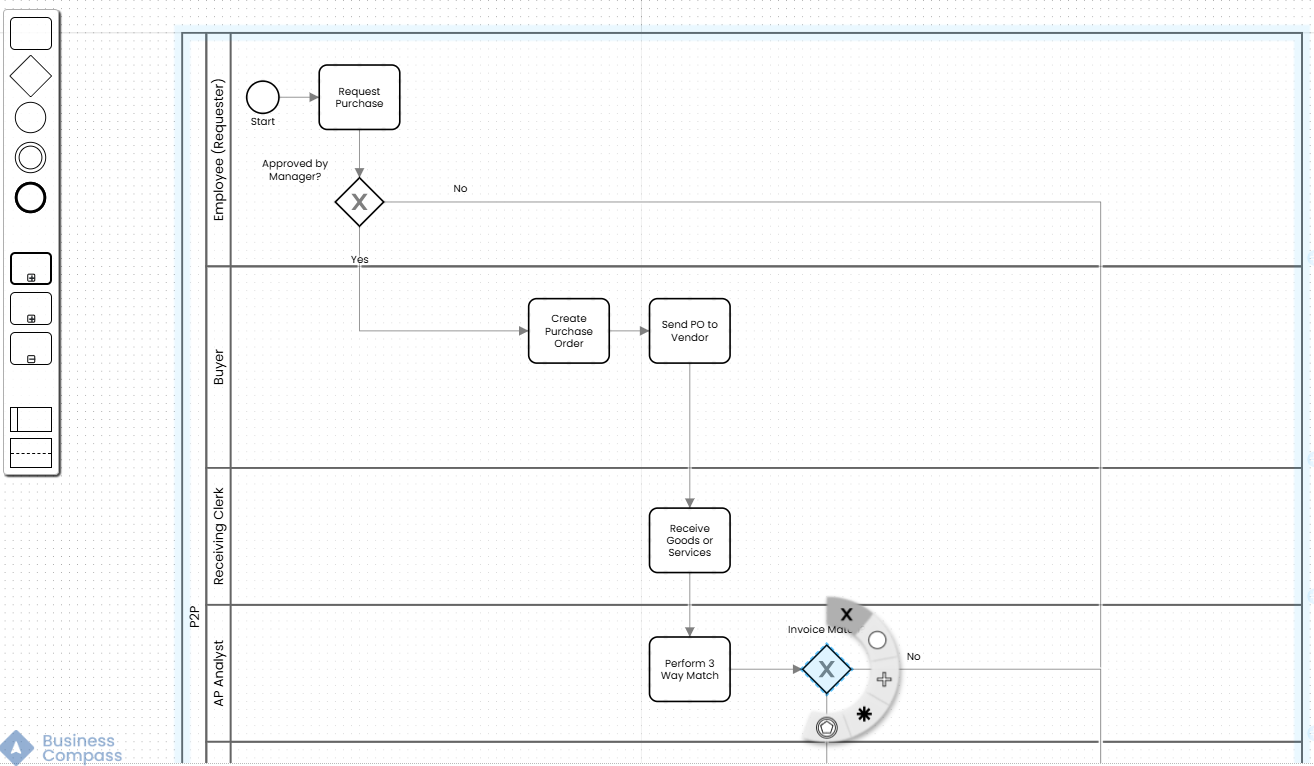
You’re in the modeler now. Build the as‑is first, don’t optimize yet. Keep in mind that this only applies to option A.
Add a Start Event in the first participant lane.
Create swimlanes for roles: Employee, Line Manager, Buyer, Receiving Clerk, AP Analyst, AP Manager, Treasury, Vendor.
Add activities in order (drag Task → label it):
Request Purchase
Manager Approval (add an Exclusive Gateway labeled: Approved?)
Create PO
Send PO to Vendor
Receive Goods/Services
Perform 3‑Way Match (PO + Invoice + Receipt)
Approve Invoice for Payment (gateway here for Match OK?)
Issue Payment
Archive & Close PO → End Event
Connect activities with sequence flows and label branches (e.g., “Approved”, “Rejected”, “Match Error”).
Remember: This is your factual baseline, capture reality, including manual steps and exceptions.
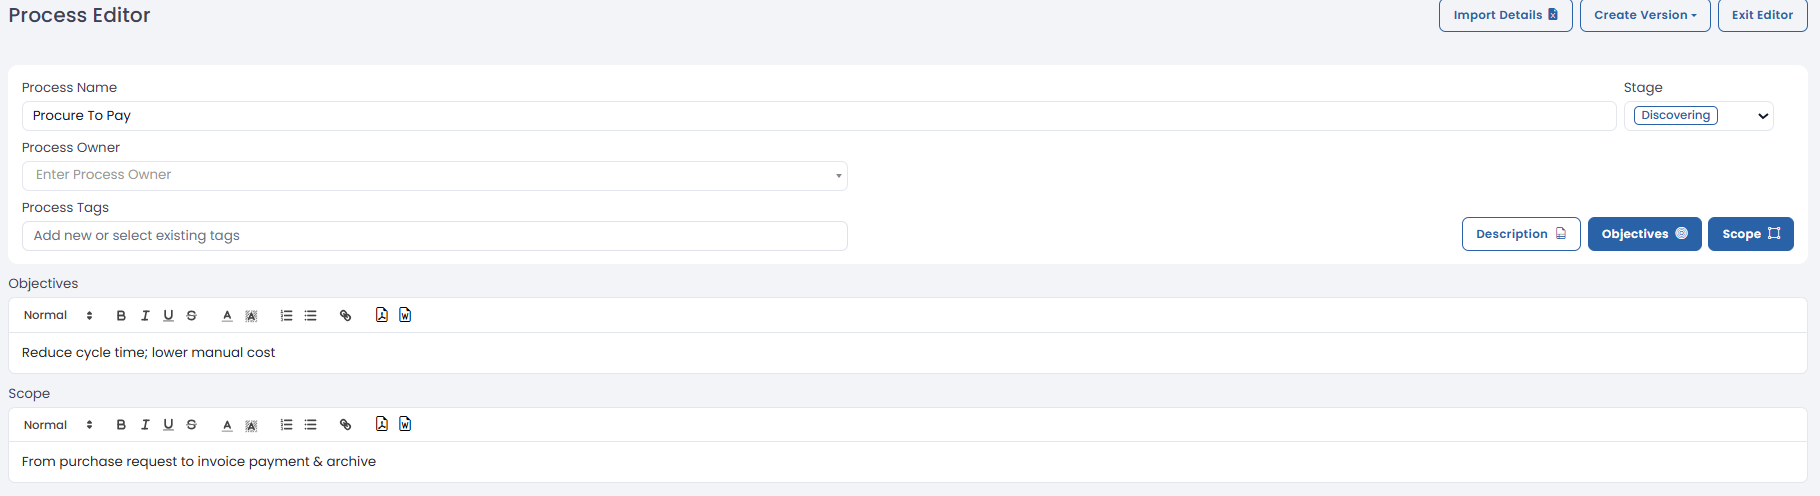
Part 3: Add process‑level details
In the editor mode, you can add process information.
Fill these fields:
Name: Procure to Pay
Scope: From purchase request to invoice payment & archive
When exit the editor mode the new information is saved automatically.
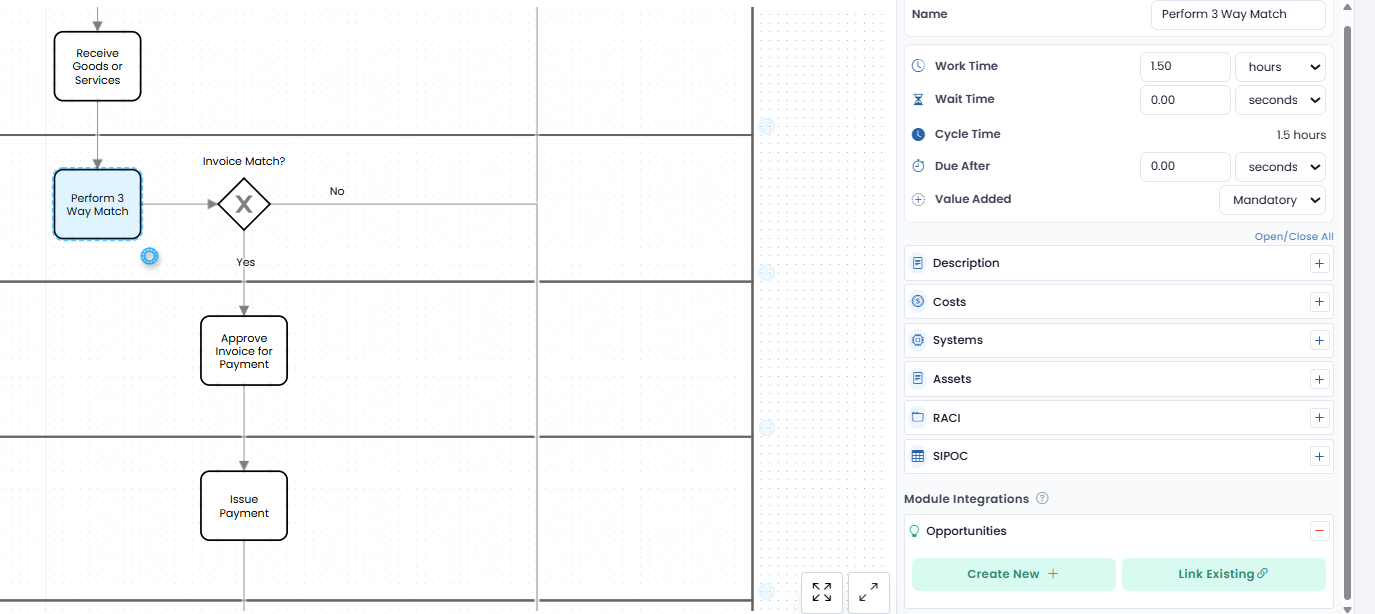
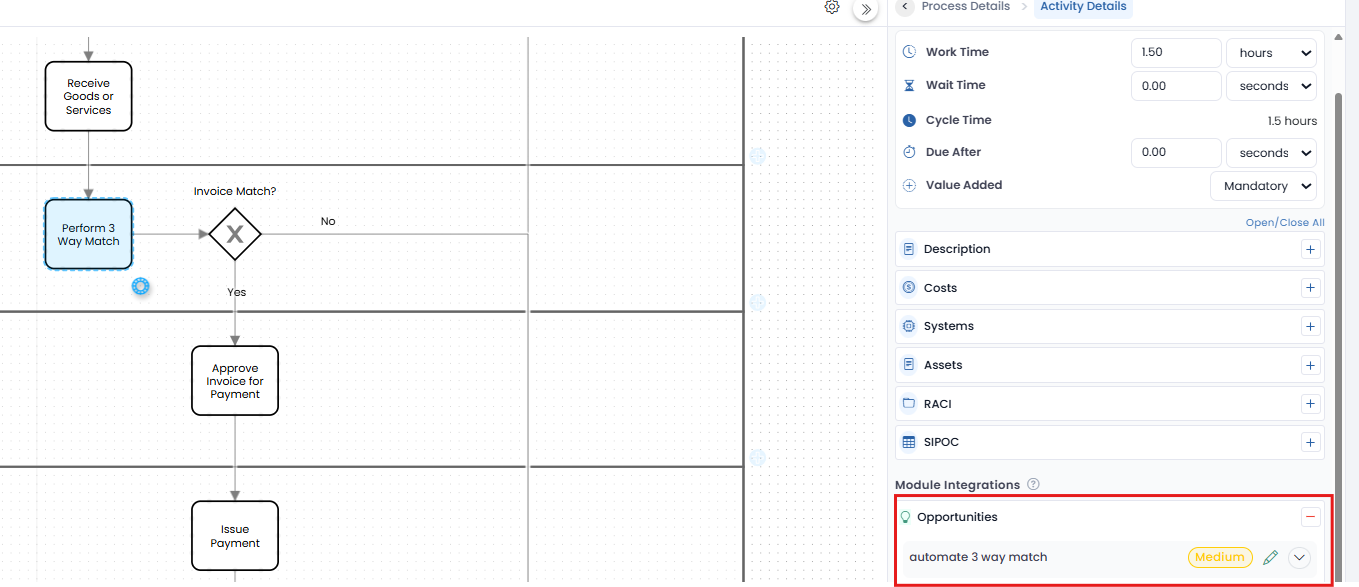
Part 4: Add activity‑level metadata (this powers simulation & analysis)
Click any activity → open the right‑hand Activity Details.
For each activity add:
RACI: Responsible / Accountable / Consulted / Informed (use people or teams).
System: SAP / Email / Portal / None.
Task Type: Manual or Automated.
Work Time: e.g., 30 min (and a deviation, e.g., ± 5 min).
Cost per Run: e.g., $25. (Labor cost or operational cost)
Value Added: Yes / No / Mandatory
Inputs / Outputs: PO, Invoice, Goods Receipt.
Notes: optional business rules or attachments.
Example (3‑Way Match):
Responsible: AP Analyst
Accountable: AP Manager
System: SAP
Type: Manual
Work Time: 90 min ± 20%
Cost: $60 per run
Value Added: Mandatory
Part 5: Classify metadata (searchable vs non‑searchable)
Understanding this stops surprises later.
Searchable (used for filters & rollups): RACI, Systems, SIPOC, Inputs/Outputs, Value Added, Tags.
Non‑Searchable (stored, shown but not indexed): Raw Work Time, Wait Time, Cost Currency + frequency.
When in doubt, put governance or owner fields in searchable so reporting can slice by them.
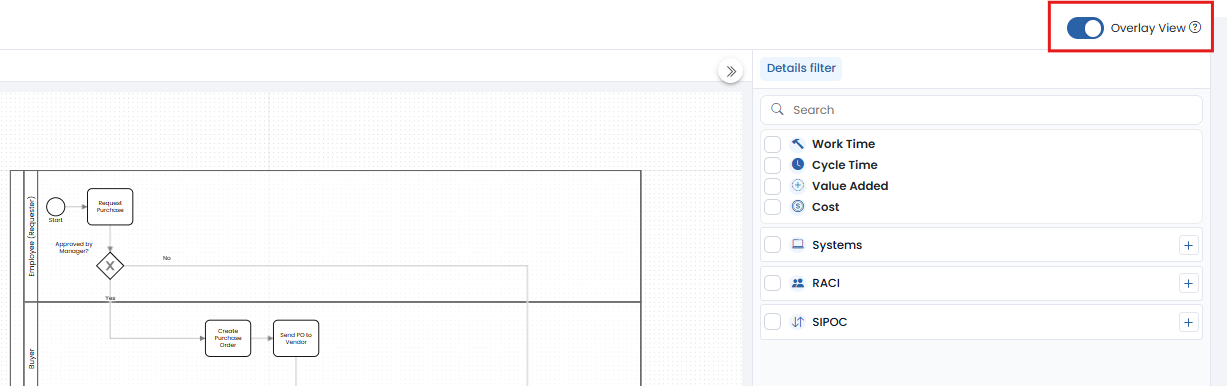
Part 6: Overlay View: Visual insights (quick health check)
This is where the diagram becomes a dashboard.
Toggle Overlay View on the canvas.
Select what to overlay: Roles, Cost, Time, Systems, Value‑Added.
Colors and icons will show hotspots, e.g., high‑cost tasks or single‑owner bottlenecks.
Hover an element for tooltips with the metadata summary.
Use the Overlay to spot missing metadata (unfilled fields show as gaps).
Part 7: Import metadata at scale: Excel Mapping Wizard (Optional)
If you’re documenting a small process with just a few activities, you can skip this step and enter metadata manually. But if you’re working on a large process with dozens of activities, the Excel Mapping Wizard saves you time.
Here’s how it works:
Prepare your spreadsheet using the BC template (include Activity Name, Role, System, Work Time, Cost, etc.).
In Business Compass, go the Process that you want to add detail, click on Import Details→ Excel Mapping Wizard.
Step 1: Upload your file.
Step 2: Map your columns to BC fields (e.g., Activity Name → Activity).
Step 3: Match Excel rows to BPMN activities (the tool auto-matches by name, just review and confirm).
Step 4: Preview and confirm the import.
After import, open Overlay View to validate values and fix any mismatches. If the import fails, check column names or activity labels and try again.
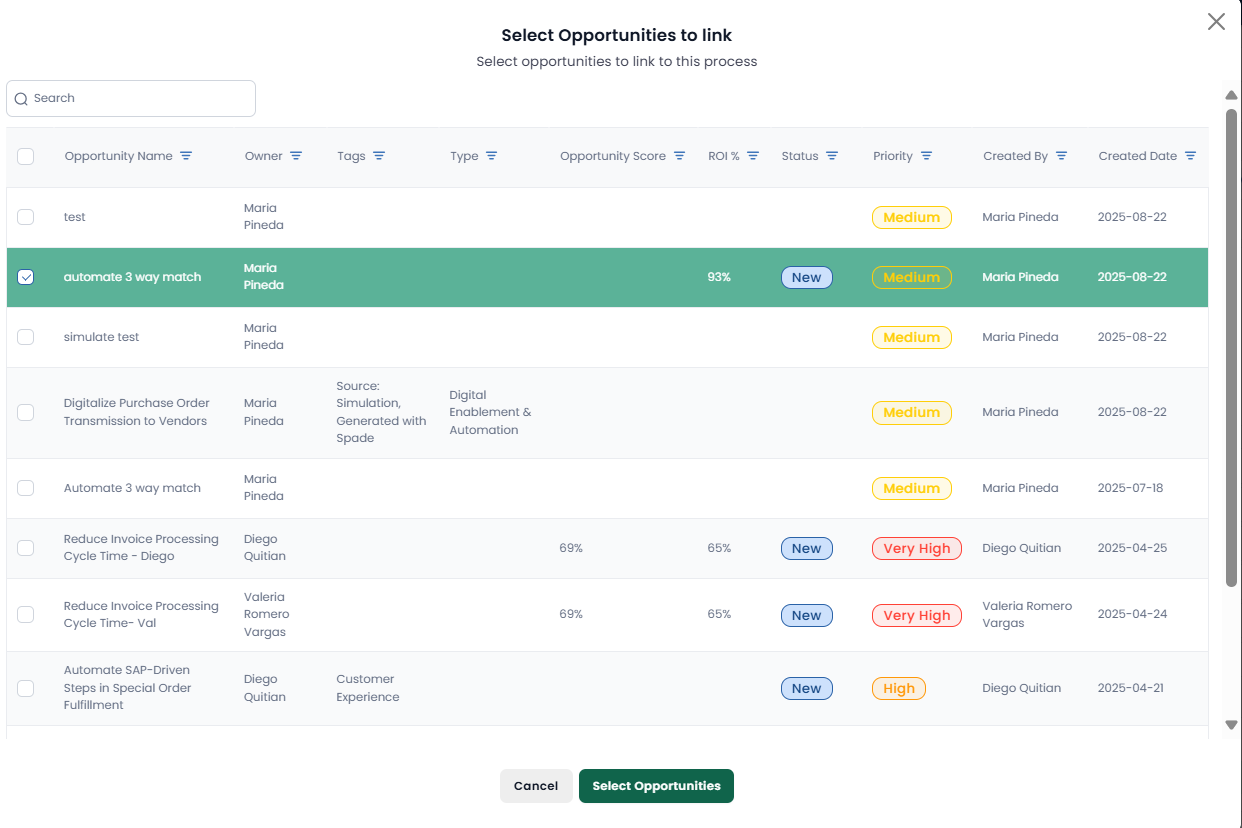
Part 8: Link and create opportunities (from inside the process)
This step helps you connect process issues with improvement ideas. Not required, but very powerful if you’re doing optimization.
Here is an example
Click an activity (e.g., 3‑Way Match).
In the Opportunities section click Link Opportunity → Click Link Existing and Select the opportunity from the list.
The opportunity now is linked to the activity.
Behavior: Opportunities are visible in both the Process and Opportunity modules and roll up to folder dashboards.
Part 9: Prepare the process for simulation (checklist)
Before you run simulations, make sure the model has these items:
Each activity has Work Time + optional deviation.
All gateways have branch probabilities that sum to 100%.
Resources mapped to swimlanes (people or system).
Task type identified (Manual vs Automated).
Cost per activity filled (if you want cost KPIs).
Volume or arrival pattern (set in Simulation module later).
If anything is missing, the Simulation module will warn you, save fixes and re‑run.
Once your process models are complete and fully documented, you have a clear foundation for driving improvement across your organization. From here, you can send your as-is and to-be models into the Simulation Module to compare performance, link them directly to opportunities in the Opportunity Center for prioritization, and monitor results in the Insights Dashboard. Every change you make in the Business Process Center becomes part of a connected improvement ecosystem, ensuring that your process data, analysis, and decisions stay aligned.
Want to see it in action? Explore our Procure-to-Pay use case and discover how modeling as-is and to-be processes can unlock real improvement opportunities.
Stop Guessing. Start Knowing.
Every day you wait is another day that six-figure savings stay hidden in your processes. Take the first step.